Grow lights and tips for successful early seed germination
Looking to grow from seed? Les Jack shares his top tips for generating the ideal growing conditions and the importance of creating the correct light source for successful germination. Read on to discover his recommended techniques…

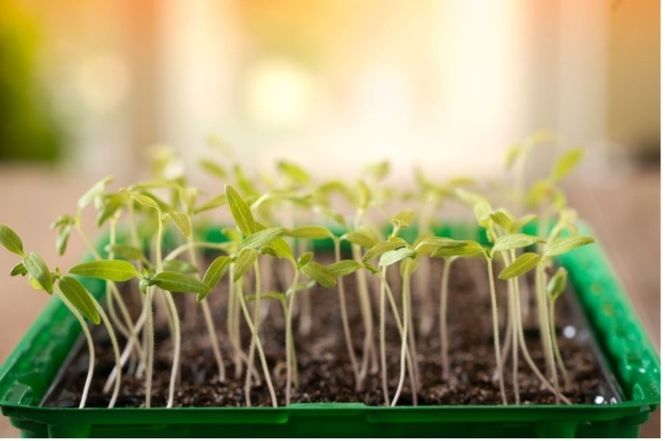
It’s January and it’s raining, so a good time to think about growing from seed, especially when to start tomatoes, cucumbers and courgettes. It’s easy to leave it too late and end up buying plants from the garden centre where you are restricted to the varieties they offer, but if you have the space and the time, growing from seed is worthwhile. However, most of us don’t have the appropriate growing conditions for germination and growing on indoors, and while germination is not so difficult, it’s disappointing to see seedlings stretch to find enough light, ending up with weak and leggy plants.
Last winter I looked at grow lights and many are available, from expensive professional setups, to hobby units, but as with buying a light bulb for a lamp these days, there are a number of factors to consider, including how bright the light is, the colours of light emitted by the bulb and how this relates to the plant's requirements at different stages of growth. I'll start by looking at how bright the light is - most are now LED, and rated in watts (W) and lumens (lm).
What is a Lumen?
A lumen rating, denoted as "lm," measures the total amount of visible light emitted by a light source, with higher lumen ratings indicating brighter light.
Lumens vs. Watts:
While wattage measures the amount of energy a light source consumes, lumens measure the amount of visible light it produces. LEDs are more efficient than older technologies, meaning they can produce the same amount of light (measured in lumens) with much less wattage.
Why lumens matter:
When buying light bulbs, especially LEDs, it's important to focus on lumens rather than watts to ensure you get the desired brightness.
For example, to replace a 100-watt incandescent bulb, look for an LED bulb with around 1600 lumens and 23 watts.
Most of the cheaper grow lights don’t provide a lumen rating, so it’s not clear how bright the lights will be. These lights may be cheap, but lack sufficient illumination, so I’d avoid those. You must know the lumen rating to ensure sufficient light.
The brighter your white LED lights are, the higher the lumens value. Brighter means you can place the lights higher, above the seed starts, and that you will get more coverage of quality growing light. That leads us to the visible spectrum of light the bulb emits and what parts of this spectrum matter for different stages of plant growth.
What is sunlight and what colours do plants use?
The primary colours of light are red, blue, and green. The spectrum of visible light falls in the wavelength range of 400-700 nanometers.
Plants are green because they do not absorb green and yellow light. They don't use it. They reflect that wavelength back and our eyes see plants as green. Plants absorb red and blue light. That is why specialty grow lights focus on light that is red and blue. They may work better but are considerably more expensive. White light is made when the red, blue, and green colours/wavelengths are present. Mixing them all, makes white light. White LED lights have the green wavelength of visible light in it. Plant don't use that wavelength for photosynthesis. That leads us to PAR value.
Photosynthetic Active Radiation or PAR value is essentially the wavelengths of light a plant actually uses for photosynthesis. PAR values do extend beyond the visible light spectrum of 400-700 nanometers but for practical purposes it represents the amount of useable light, in the human eye spectrum, which is pretty much blue and red light.

You won't find PAR value on most white LED lights because it is not relevant to the human eye. More expensive grow light systems will have this. White LEDs are rated on lumens and colour temperature with the latter being the Kelvin rating.
A Kelvin rating of 5100-6500K is considered day light. In brief, the higher the kelvin rating the whiter the colour. I recommend a Kelvin value of 6500K when you can find it, however 5100-6500K will work. It mimics the sun and like the sun, it has blue, red, and green light. The plants will use 2/3 of that spectrum.

My intention was to germinate seeds and grow on until a few inches tall, and for that, a rating of 6500K is fine, giving PAR values of around 550. If you were to grow plants indoors to the blooming and fruiting stage, then a variable or full spectrum light source, up to a PAR of 600-780 would be needed for that stage, with a Kelvin rating of 5000-1000K.
My grow light setup
I bought a six pack of Barrina LED Batten Lights 2ft, 1100lm 10W 6500K, for £34, and used four giving 4400lm in total. They came with leads to connect in series. They also had connectors which I used to attach to a piece of twinwall. Perhaps a white reflective surface would be better – I’ll consider that for this year.
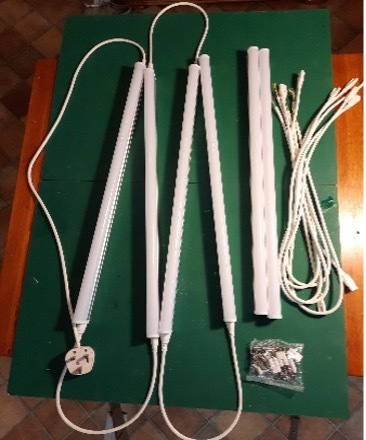
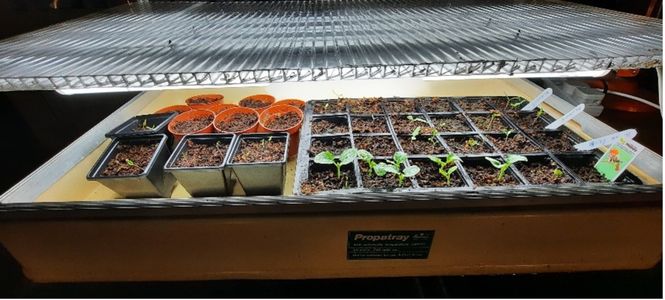
With the lights taken care of, I used an old thermostatic propagator and suspended the light frame about 6” above the pots, but a flat heat mat would do just as well.
When to sow
I use the grow light system for germination and growing on to the mature seedling stage, and harden off in the greenhouse with a heater at night. The following chart gives an indication of when to sow. Stage 1 and 2 will take around six weeks, plus another eight weeks or so to come to maturity. If I sow on the 15th February, I might hope to harden off in the greenhouse at the end of March then plant out, with ripe tomatoes in another eight weeks, say in June. At my elevation of 450ft, that timeframe never works out, with ripe fruit in July, hopefully, but you can see the principle.
Early-summer tomato varieties reach ripeness or maturity about 70 days after the tomato seedling is transplanted into the garden or moved to the greenhouse. Early-summer tomatoes are also known as early-season tomatoes and are often smaller and firmer than mid and late-season varieties which stay on the vine longer and are exposed to more hot weather.
Early-season tomatoes are the best choice for regions where the growing season is short or where the gardener wants to have more than one tomato harvest in a season. In cold regions, such as Scotland, the early-season tomato may be the main crop for the season. Examples would be Gardener’s Delight and Tumbling Tom.
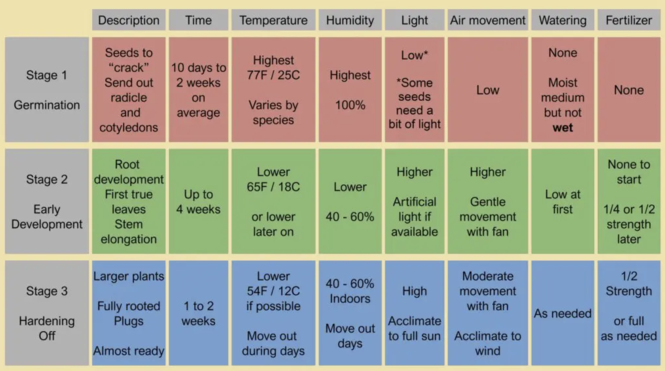
Temperature and humidity matter
Referring back to the chart, it’s clear that each stage of development requires different temperatures and humidity. For seeds to germinate, a temperature of around 18-25C and 100% humidity is needed. That’s a moist seed tray with a transparent lid. Once the seeds have germinated, the temperature should be lowered to around 18C with 40% humidity – that’s a typical kitchen environment. Most plant seeds germinate best in temperatures between 18-25C, though optimal ranges vary by species. Warm-season crops (tomatoes, peppers) prefer 24-30C, while cool-season crops (lettuce, peas) can germinate at 10-15C. Generally, soil temperatures below 10C are too cold for most seeds, causing slow germination or rot.
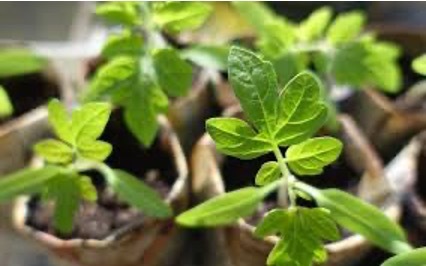
I like to sow two tomato seeds and single cucumber and courgette seeds (because they are so expensive) in tiny pots – cardboard pots work well, so I can take them out of the high humidity tray once germinated, as if left in with the other pots, they are more likely to succumb to rot or be drawn. I move them to the edge of the tray, and once half have germinated, reduce the mat temperature to about 18-20C. Note the hardening off temperature is pretty low at about 12C.
I have the grow lights on from 8am to 10pm, as it’s important that the emerging seedlings have light immediately and don’t become drawn. My light system sits in the utility room. Any additional light from a window is an added bonus.
The grow light and heating mat combination works well and gives stocky, healthy plugs, with the tomato plants much less drawn than those I have bought from the garden centre.
Finally, it’s important to begin feeding with a liquid feed just after the first true leaves are formed, as there is no fertilizer in most seed composts. Dilute Miracle Grow (high in nitrogen) alternated with tomato feed works well. Pot on as required.
With our many thanks to Les for sharing his expertise, we hope that this will inspire you to try his recommended germination growing conditions for yourself! Read more from Les here:
